
Index:
SPICE is a general-purpose circuit simulation program for non-linear dc, non-linear transient, and linear ac analyses. Circuits may contain passive components (resistors, capacitors, inductors), active devices (transistors and diodes), and independent voltage and current source..., etc. In this tutorial, we will illustrate the use of the simulator with a CMOS inverter as shown in Fig.1 below.
In this figure, there are two transistors of the same dimensions, L=1.2U and W=3.6U and their gates are connected together at node #2.:
pch is the p-channel or PMOS transistor. Its terminals, drain, gate and source are connected to nodes #3, #2 and #1 respectively.
nch is the n-channel or NMOS transistor. Its terminals, drain, gate and source are connected to nodes #3, #2 and #0 respectively.
Node #0 is connected to ground, Node #1 is connected to the supply voltage, VCC, Node #2 is connected to the input, in, and node #3, the output and is connected to a load capacitance of 0.1P farads. This load represents the input capacitance of any other gate that is driven by the inverter and the value is arbitrarily chosen.
Title Line #1: The first line of SPICE source code is the title line and will be ignored by Spice compiler. You may leave it blank , but it is preferable that you use it to identify your circuit.
Column 1 is blank or is *: The asterisk in the first column indicates that this line is a comment line. Comment lines may be placed anywhere in the circuit description. Note that SPICE3 also considers any line with leading white space to be a comment.
M1 3 2 1 1 PCH W=3.6U L=1.2U
M1 is the Mname given to the PCH transitor shown
in the Fig. 1. This is followed by the node numbers of the drain, gate,
source and substrate of the transistor in this specific order. Thus node
#3 refers to the drain, node #2 is the gate and node #1 connects the source
and the substrate to the supply voltage VCC. These node numbers are exactly
the same as shown in Fig. 1. Then PCH indicates that transistor M1 is of
p-channel model defined on later in the files.
M2 3 2 0 0 NCH W=3.6U L=1.2U
M2: In a similar fashion, the
drain, gate, and source of the nch, M2, are connected respectively to #3,
#2 and #0. The latest node is the ground. NCH refers to the model of this
transistor. The other entries give the width and length of the channel.
C3 3 0 0.1p
C3: specifies the load load capacitance, C3, as a 0.1 picofarad capacitor with
positive connected to node 3 and negative to the ground node 0.
| Spice symbol | Value in Scientific Notation |
|---|---|
| T | 1E12 |
| G | 1E9 |
| MEG | 1E6 (HSpice must use X) |
| X | 1E6 (HSpice only) |
| K | 1E3 |
| M | 1E-3 |
| U | 1E-6 |
| N | 1E-9 |
| P | 1E-12 |
| F | 1E-15 |
VCC 1 0 DC=5.0: Here the independant voltage sources are defined. This line tells us that a DC source of 5V is applied accross node #1 and ground. Also, a voltage, VIN is applied at the gates of the transistors, node #2. The value of this source is then specified on the next line. VIN takes DC values between 0 and 5V in increments of 0.1V. This specification is for the DC sweep.
.MODEL define the transistor models, PCH and NCH. The example uses SPICE level 2. You may substitute this level by any other one. Some of the parameter used are the threshold voltage, the process transconductance, etc.
* CMOS Inverter Voltage Transfer Characteristic

*
*TRANSISTOR
*Mname DRAIN GATE SOURCE SUBSTRATE MODEL WIDTH   LENGTH
*      NODE  NODE NODE   NODE      NAME  MICRONS MICRONS
*----- ----- ---- ------ --------- ----  ------- ------
M1     3     2    1      1         PCH   W=3.6U  L=1.2U

M2     3     2    0      0         NCH   W=3.6U  L=1.2U

*
*CAPACITOR
*Cname +NODE -NODE VALUE(Picofarads)
*----- ----- ----- -----------------
C3     3     0     0.1P

*
* INDEPENDANT VOLTAGE SOURCE
*
*Vname +NODE -NODE VALUE
*----- ----- ----- -----
VCC    1     0     DC=5.0


* The following two lines are for DC analysis
VIN    2     0

.DC VIN 0 5 0.1


* TEMPERATURE SETTING

.OPTIONS TEMP=25 METHOD=GEAR

*MODEL NAME TYPE
*----- ---- ----
.MODEL NCH  NMOS (level=2 LD=0.15U TOX=200.0E-10 NSUB=5.37E+15
+ VTO=0.74 KP=8.0E-05 GAMMA=0.54 PHI=0.6 U0=656 UEXP=0.157 UCRIT=31444
+ DELTA=2.34 VMAX=55261 Xj=0.2U LAMBDA=0.037 NFS=1E+12 NEFF=1.001 NSS=1E+11
+ TPG=1.0 RSH=70.00
+ CGDO=4.3E-10 CGSO=4.3E-10 Cj=0.0003 Mj=0.66
+ CJSW=8.0E-10 MJSW=0.24 PB=0.58

.MODEL PCH PMOS(level=2 LD=0.15U TOX=200.0E-10 NSUB=4.33E+15
+ VTO=-0.74 KP=2.70E-05 GAMMA=0.58 PHI=0.6 U0=262 UEXP=0.324 UCRIT=65720
+ DELTA=1.79 VMAX=25694 Xj=0.25U LAMBDA=0.061 NFS=1E+12 NEFF=1.001 NSS=1E+11
+ TPG=1.0 RSH=121.00
+ CGDO=4.3E-10 CGSO=4.3E-10 Cj=0.0005 Mj=0.51
+ CJSW=1.35E-10 MJSW=0.24 PB=0.64

.END
Save this example SPICE source code as tut_spice3_invertor_dc.cir
For example, copy the tut_spice3_invertor_dc.cir into your directory. To start SPICE3 and load that example you have edited, type:
spice3
On the screen you will see:
Spice 1 ->
which indicate that you are inside the SPICE interactive environment.
In order to load your design, type
Spice 1 -> source tut_spice3_invertor_dc.cir
To to see the SPICE source code you have loaded, type the following:
Spice 2 -> listing
To simulate that circuit described in that SPICE source code, type:
Spice 3 -> run
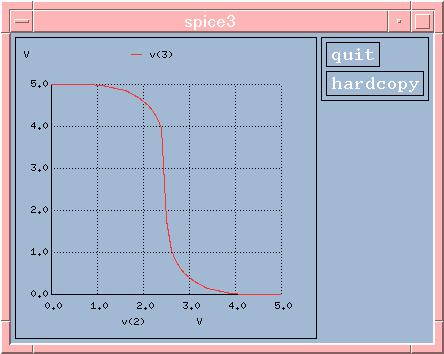
For the DC analysis plot between node 3 and node 2 in this example, type:
Spice 4 -> plot v(3) vs v(2)
will get the graph as shown in Fig. 2.
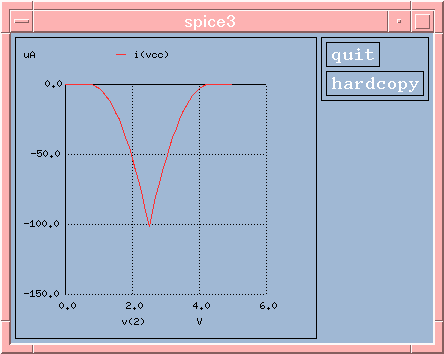
For current vs. input voltage diagram, type:
Spice 5 -> plot i(VCC) vs v(2)
you will get the graph as shown in Fig 2a.
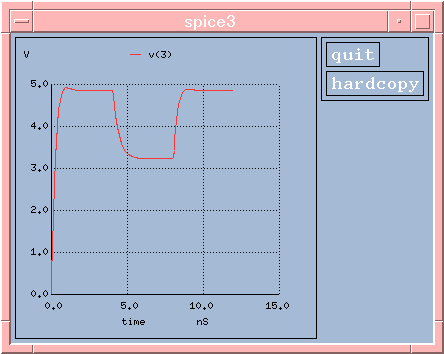
For transient analysis , substitute the 'VIN 2 0' and '.DC VIN 0 5 0.1' with the following two statements. The PWL option stands for piecewise linear signal where each pair (Ti, Vi) specifies that the value of the source is Vi (in Volts or Amps) at time=Ti. The value of the source at intermediate values of time is determined by using linear interpolation on the input values.
The new Vin statement will create a 5 nanosecond 3 volt pulse. Initially, it begins with zero volts at time 0 and will jump to 3 volts at 4.1 nanoseconds. It will hold for 5 nanoseconds until the time is 8.1 nanoseconds, and then the pulse returns to zero volts.
*
*Vname +Node -Node Option T1  V1   T2  V2   T3   V3  T4  V4  T5   V5
*----- ----- ----- ------ --  --   --  --   ---- --  --  --  ---- --
Vin     2     0    PWL(   0   0    4N  0    4.1N 3   8N  3   8.1N 0  )

*     TSTEP TSTOP
.TRAN 0.1N  12N
In this example, copy the tut_spice3_invertor_trans.cir and in order to read this file without exiting spice, type:
Spice 6 -> source tut_spice3_invertor_trans.cir
Of course, it has to be run again
Spice 7 -> run
Spice 8 -> plot v(3)
will plot the Voltage versus Time diagram of the output voltage of the CMOS invertor (i.e. node 3) on the screen as shown below.
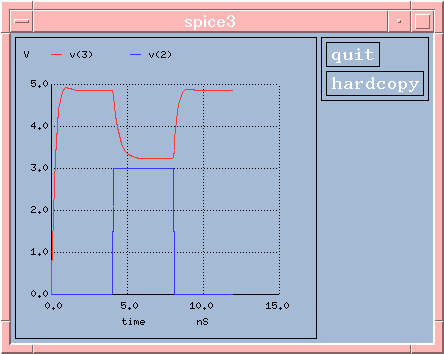
Spice 9 -> plot v(3),v(2)
will plot the Voltage versus Time diagram of the CMOS invertor output (i.e. node 3) and the CMOS invertor input Vin (i.e. node 2) on the same graph window as shown below.
For power analysis, type:
Spice 10 -> plot v(3)*abs(i(vcc))

Observe that for CMOS logic that the majority of the power is consumed during input switching activity, as we expect!
To save the numerical data. (DO NOT USE THE SAME NAME AS THE SPICE SOURCE CODE FILE, OR IT WILL BE OVERWRITTEN).
Before we write, we may want to see our current file directory before overwriting something accidently. In order to issue unix commands with in spice, then use the "shell" command. For example, we would like to see the directory:
Spice 12 -> shell ls
For example, if you want to save the voltage analysis of node 3 to a text file named datav3.txt, type:
Spice 13 -> print v(3) > data_v3.txt
The > redirects the print output to the file, data_v3.txt. The "print v(3)" by itself will display it on the current console screen. Use "q" to quit viewing it on the screen.
We can double check, if the written file contains the data we desired, by viewing again within:
Spice 14 -> shell more data_v3.txt
If you don't want the page breaks in the output print file because you might want to read it into another program, then type:
Spice 15 -> set nobreak
If you want to save all the analysis of all the node to data_all.txt , type:
Spice 16 -> print all >data_all.txt
To save the plot graph data, you have to check your printer's type first (or later the printer won't be able to print the graph out), you should set first the output file format to postscript (for HP laser jet printer):
Spice 17 -> set hcopydevtype=postscript
then save the graph :
Spice 18 -> hardcopy plot_all.ps
after this you will get the message:
type the variable you want the plot to be saved.(e.g.v(3),vdb(3),vp(1)).
For more variables on the same graph, say v(3) and v(2), type:
Spice 19 -> hardcopy plot_v2v3.ps v(3) v(2)
The plots of v(3) and v(2) will be saved in a file called plot_v2v3.ps .
And finally to quit, type:Spice 20 -> quit
For example, if you want to load the results saved in file node3.result, type:
the result will be loaded. You may use plot v(3) to see the graph.
Printing is performed through the Open Spool facility. You have to exit SPICE using the quit command, and return to the UNIX environment to print and plot. (DO NOT FORGET TO SAVE YOUR RESULTS PRIOR TO THIS, OR YOU WILL NOT BE ABLE TO PRINT/PLOT THEM)
For printing your numerical results from the file where they were saved, you have to make sure first that file is in ASCII format, (or the print out will be a totally messy. Refer to 5.Saving the results of analysis to see how to save it in ASCII format) ,and then type the following:
In this example, you may type as following to print out your numerical results.
or
In this example, you may type:
If there is any error, type edit to invoke TEXT EDITOR to edit that SPICE source code. After you correct all the errors, don't forget to save it. Then exit the TEXT EDITOR, the message displayed:
running circuit ? --respond with y or n.
Practice with this tut_spice3_invertor_bad.cir file and remove each error and observe the results.